Documentation
This application provides an intuitive mechanism to guide the user with the placement of insulin pumps, insulin pens, and glucose monitor and keep track of their position history to enable site rotation and reduce skin pathologies.
Soon available at the Apple App Store.
Table of Contents
- Privacy policy
- Website homepage
- Site rotation
- Purpose of this app
- Who is this app for?
- Layout
- Two stages of operation
- List of Screens
- Home screen
- Stats screen
- History screen
- Settings screen
- Colors screen
- Time settings screen
- Users screen
- Photos screen
Privacy policy
Click this link to view the privacy policy for this app.
Website homepage
Click this link to go to the website homepage for this app.
Site rotation
Prolonged injection of insulin at a single location can result in tissue damage and decrease the diffusion characteristics of the location.
After an insulin pump has stayed in position for several days it is recommended the pump be moved to a new location that has not been used for some period of time.
This allows the site to recover from the insulin infusion.
This process of moving the pump from place to place is called site rotation.
Purpose of this app
This app provides an intuitive mechanism for the user to select spots for insulin device placement and keep track of the injection site history to enable site rotation and reduce skin pathologies. This works for insulin pumps, syringe injection, and continuous glucose monitors.
This app does not give medical advice. Rather, it helps users remember the site history of insulin devices and thus make informed decisions about where to place their devices to better implement site rotation and reduce skin pathologies.
Who is this app for?
This app is intended for any diabetic (type 1 or 2) who wants to keep track of their injection site history to enable site rotation. Also parents, caregivers, and medical professionals who need to perform this function for people with diabetes.
Layout
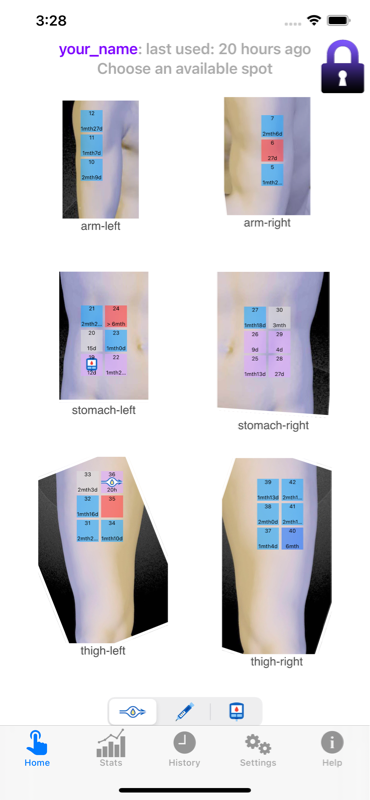
Opening the app we see several locations around the body with photos and groups of spots available to place an Insulin pump or other device. The spots are color coded to indicate status, as explained in the Colors screen. The photo overlays help with the orientation and positioning of spots. In the upper-right corner is the Lock icon. When in place, this prevents changes from happening accidentally. Along the bottom is the tab menu to navigate to the various screens. Just above that is the Device menu showing the three device types: pump, syringe, and continuous glucose monitor. These are all explained in detail in the next sections.
Two stages of operation
Use of this app is in two stages:
- Creating a new user profile to be done once followed by
- The typical selecting of spots for pump placement or other devices.
Creating a user profile (stage 1) can be done in two ways:
- Selecting a pre-made user profile on the Users screen. This is the easiest and quickest way to get started.
- Manual setup of a profile in the Photos screen. This allows the ultimate in customization but is an intermediate topic and not recommended for first-time users.
After this, the app is ready to help you select spots for pump placement and site rotation in the Home screen. This is described in the Home screen section.
List of Screens:
Along the bottom of each screen is a tab menu to navigate to the various screens.
- Home: the primary screen for spot selection.
- Stats: presents compliance, spot usage, and override statistics.
- History: lists all the site selections in the recent past.
- Settings: shows the list of screens with user settings.
- Users: where you manage the users and their data.
- Colors: allows the user to select a color scheme to see at a glance the status of each spot.
- Time settings: where you manage the time parameters for each device type and a few other items
- Photos: allows the user to manually adjust spot configurations and photos.
- Help: links to how to get started with the app and the online documentation for this app.
All these screens are described in the following sections.
Home screen:
Introductory Home screen video:
The Home screen is the primary screen for spot selection
- Shows the layout of spots in groups.
- The spots are color coded to indicate status.
- Allows selection of spots for pump placement and injection sites.
- Locked/unlocked button to prevent accidental changes.
- Select the device type to use: pump, syringe, or continuous glucose monitor.
- You can also edit the spots from the Home screen.
All these functions are described in the following sections.
Availability status of each spot
Spots are either available for selection or are unavailable.
Unavailable spots are:
- Recently used spots
- Near spots that are adjacent to a recently used spot
- Avoid spots as labeled in the Avoid screen
Unavailable spots can not be selected. They are color coded to make them easy to identify as described in the next section. (Actually, unavailable spots can be selected through the easy override process described below.)
All other spots are available and can be selected. Their color coding makes them easy to identify. There are two types of available spots:
- Available
- Best
The Best spots are simply the oldest available spots that haven’t been used for the longest time. Both types of spots can be selected at any time. It is recommended to choose a Best spot when available as this promotes uniformity of spot usage over time.
There is one more class of spots:
- New
A spot is New when it has just been selected. It can be deselected in case of error or change of mind. It will remain in the New state for ten seconds, after which it will turn to Recent status. This is described in detail in the Spot selection section below.
Color coding
Each spot is color coded to indicate the status of the spot. The particular colors used are determined by the scheme chosen in the Colors screen section below.
In the Home screen the colors correspond to:
- Avoid - spot to avoid - arbitrarily assigned in the Avoid screen
- Recent - unavailable spot used recently
- Near - unavailable spot adjacent (or near) to a recently used spot
- New - chosen spot (will turn Recent after ten seconds)
- Available - available spot
- Best - oldest available spot
Device menu
There are three device types: pump, syringe, and continuous glucose monitor. These appear in the device menu at the bottom-middle of the main screen just above the tab menu icons. This is shown in the photo:
Select a device type before selecting a spot.
Lock icon
Before selecting a spot one must unlock the screen by tapping the Lock icon in the upper-right corner. This is shown in the photo:
The lock helps you avoid selecting spots by mistake just by touching the screen, which is easy to do. So unlock just before selecting a spot.
Zooming into groups
The Home screen shows the layout of spots in groups each with a photo. You can zoom into a group by tapping on the photo. Tapping off the photo zooms back out showing all the groups. This lets you more easily see and select a spot for a device. You can also zoom in or out with the usual pinch operation.
Spot selection
The primary purpose of this app is to select an available spot for pump, syringe, or continuous glucose monitor placement. The app then remembers this spot and reminds you not to use it again too soon.
When an Available spot is tapped it changes to New status and shows the device type chosen from the device menu. The color changes reflecting the new status according to the color scheme and gives visual feedback confirming the selection.
Tapping an Unavailable spot is described in the next section Overriding spots.
You can undo a selection by tapping the same spot again or selecting a different available spot. You must do this within ten seconds of the original selection. Thus you can undo a selection in case of error or simply changing your mind.
A newly selected spot will retain its New status for ten seconds to allow change of selection. But it will eventually change to Recent status and not be directly modifiable. Every selected spot becomes an entry in the History screen. It’s possible to alter entries in the history screen.
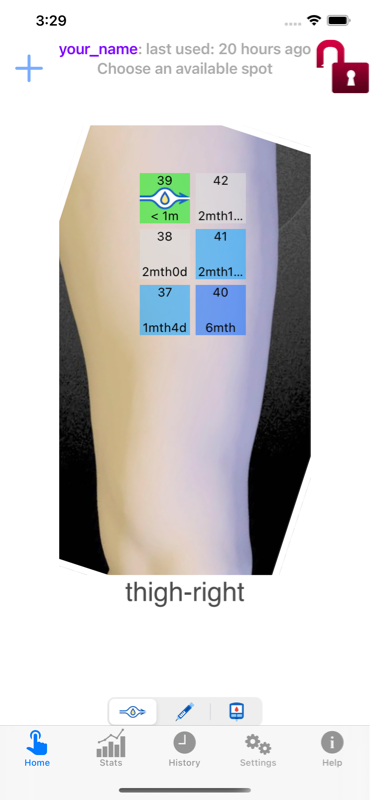
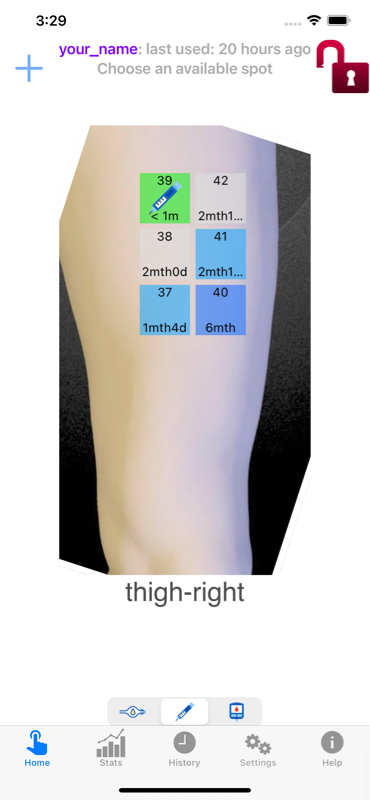
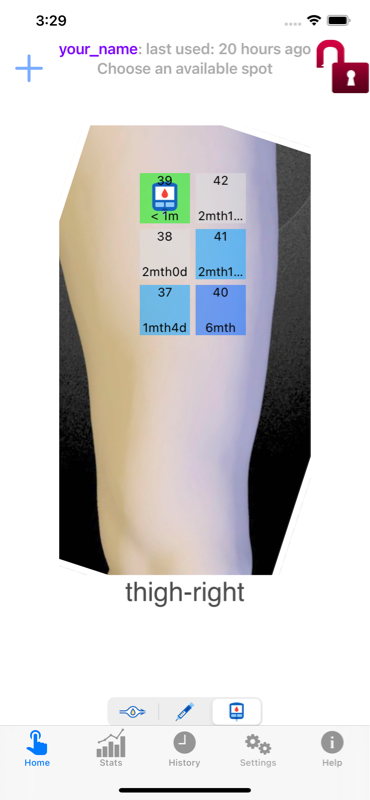
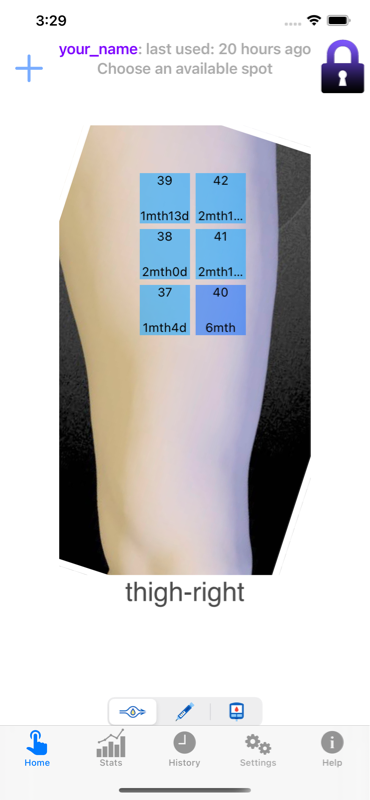
As an example, the next photo shows six spots on the thigh. They are all blue according to the default color scheme indicating Available. To select one of these spots one must first unlock the screen by tapping the Lock icon in the upper-right corner. Next select the device type from the device menu. The next photo shows the Unlock icon and the pump device selected and spot 39 chosen. It turned green indicating its New status. Spots 38 and 42 show light gray indicating Near status as they are adjacent to the chosen spot 39. Near status is explained in the next section. The next two photos show the same spot 39 chosen but with the device types syringe and monitor.
Overriding spots
Override spots video:
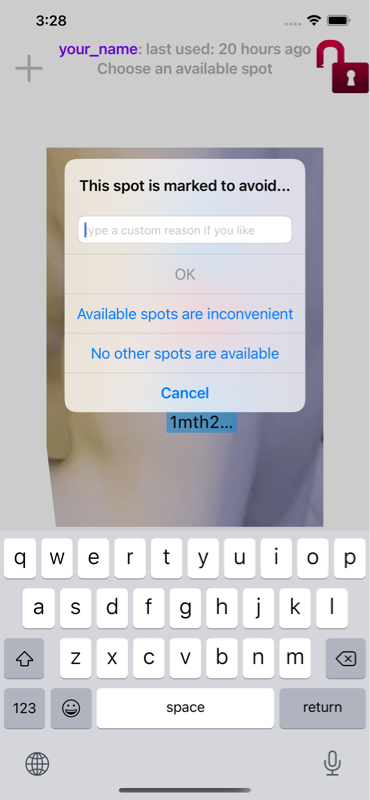
Normally one chooses only from available spots when placing a device, thus ensuring a suitable time interval has passed before reusing a spot. But sometimes a particular spot is desired despite being unavailable. In this case the app allows you to choose the spot anyway. This is called overriding the spot. Tapping on an unavailable spot brings up the Override alert box. The alert warns the user the spot is not available and gives three choices. The user may:
- Type in a reason for the override and tap OK
- Choose one of the already existing reasons listed
- Hit Cancel and get out of there.
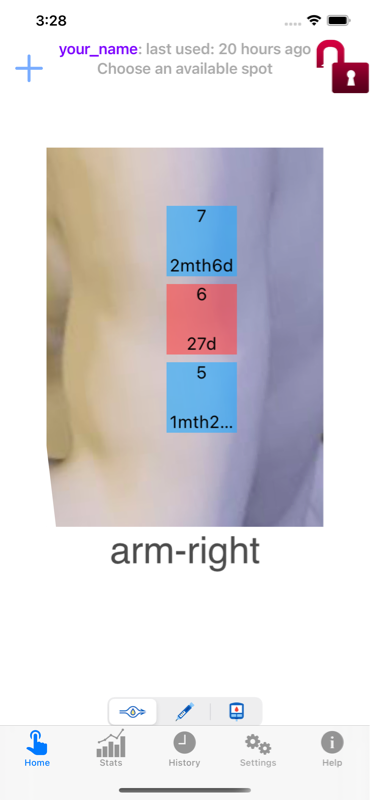
As an example, the next photo shows the upper right arm where spot 6 is mark as Avoid and not available. If we tap on this spot then the next photo shows the Override alert box presenting three options. If the user does not Cancel but proceeds with the override then the device is allowed on the spot and the override reason is stored in the History list. Override reasons can be accessed in the Stats screen and even modified in the History screen
Obviously it's not recommended to be overriding spots often. But it's too annoying to have an app refuse to let you choose the spot you must have. So override the spot and explain to the doctor later...
Avoiding spots
Spots may be marked to avoid on the Home screen. This is done by a long-press on the spot, that is, touch the spot and hold for 1 second. The spot will turn red indicating the spot is to be avoided. The image below shows the Home screen with some spots to be avoided in red. The actual color for an avoid spot will depend on the color scheme chosen in the Colors screen.
If for any reason you want to avoid using a spot or spots you can long-press them on the Home screen. They will immediately turn to the Avoid color. Spots with lipoatrophy are good candidates. This can be changed or undone at any time. Spots to avoid will be clearly shown in the Home screen and will be unavailable for selection.
For example, if there is a spot that is injured or sensitive then the avoid status can be set. This will give a signal to avoid that spot when selecting spots. This can be permanent or temporary. If an injured spot heals then the avoid status can be undone and the spot made available again. This process may be necessary to alert care givers that might not otherwise be aware which spots to avoid.
Use a long-press to avoid spots:
Editing spots
You can edit spots from the Home screen. That is, you can add new spots, delete spots, or move spots in any group. Zoom into the group where you want to change the spots by tapping the group photo.
This exposes a plus sign in the upper left corner of the screen. This is the edit spots button. Tap this button.
This brings up the Edit spot screen for this group. Tapping on a new location creates a spot. Tap the Save button (on the top right) to accept this addition. Tap the Cancel button (on the top left) to discard this addition. The following animation shows this process.
You can delete spots or move them. Select a spot by tapping on it. Tapping again deselects the spot. When selected the Delete button deletes the spot. You can drag selected spots to move them to a new position. Tap the Save button to keep you changes. The next animation shows this process.
If you delete a spot by mistake, the Undo button will bring it back. Also, the Cancel button will discard all changes and let you start over again.
More extensive modifications can be done in the Photos screen, where you can not only edit spots but also change group names, add and delete spot groups, change photos, and more.
Stats screen
The Stats screen shows the spot usage statistics. There are three options:
- Compliance: the percentage of time you do proper site rotation.
- Usage counts: the number of times each spot has been used.
- Override counts: the number of times each spot has been overridden when unavailable.
At the top of the screen are selector buttons for these three options: Compliance, Counts, and Overrides (see the next photo below.)
Compliance
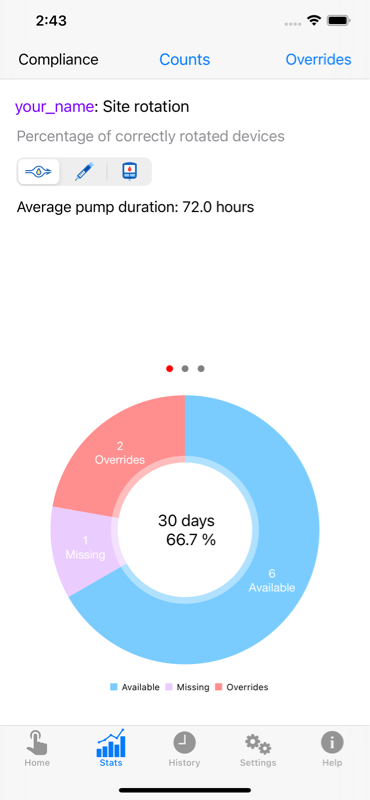
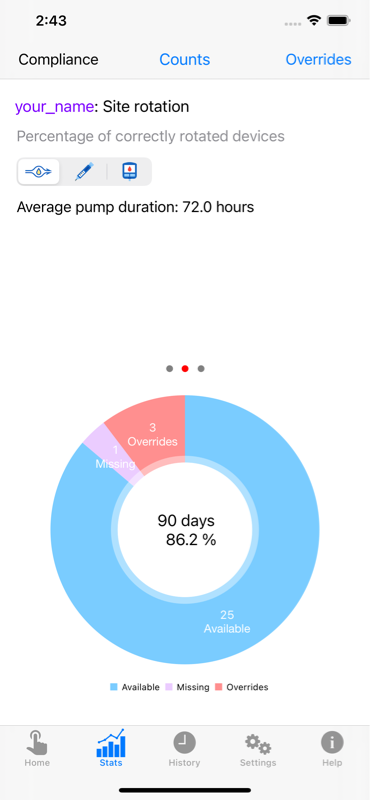
Compliance is the percent number of times that proper site rotation has been achieved. This can be calculated for each device type using the device menu. Also the compliance can be calculated for 30 days, 90 days, and the total days for which there is data in the history list. For example, the image below shows the compliance is 70% for the pump usage over the last 30 days. The chart shows 7 available spots, 2 overrides, and 1 missing were chosen over the last 30 days. Choosing available spots follows correct site rotation. But overrides do not follow proper site rotation. Missing occurs when you forget to record your choice of spot. In this case, the app notices a gap in the data and infers a missing history item.
$$compliance = {available \over available + overrides + missing}$$
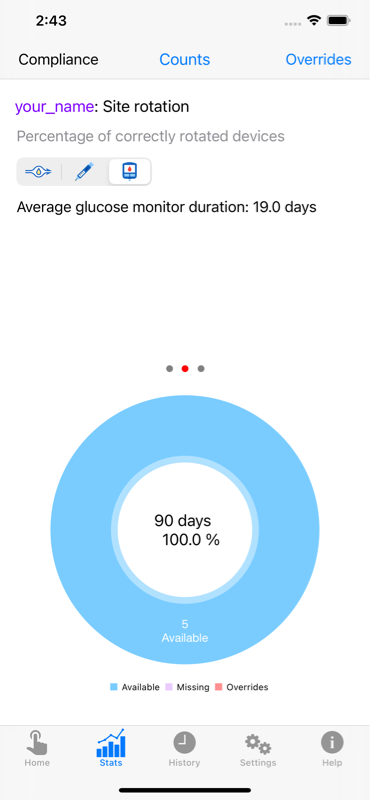
So compliance is the number of available choices over the total number during the time span indicated.The Compliance view on the Stats page shows a chart giving the numbers of available, overrides, and missing spots for the device type and during the time span indicated. To show these, tap the Compliance button at the top-left of the screen, as shown in the photo. You choose pump, syringe, or glucose monitor in the device menu. Swiping the plot cycles through the time spans of: 30 days, 90 days, and all days (when available.) The first plot shows the compliance for pumps over the last 30 days. The next plot shows the compliance for pumps over the last 90 days. Tapping the glucose monitor, the next plot shows the compliance for glucose monitors over the last 90 days.
Usage counts
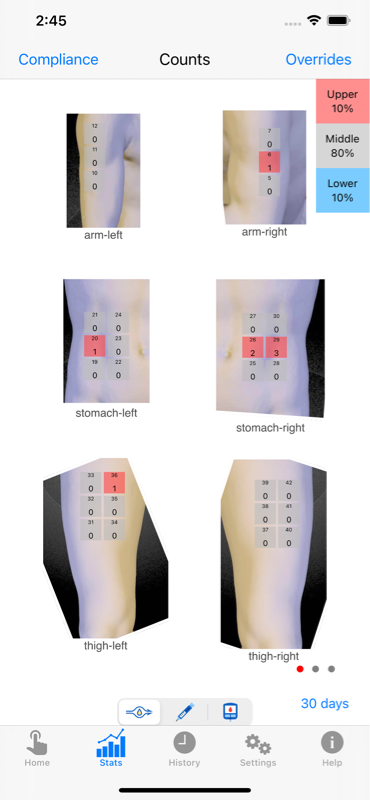
The Usage counts are simply the number of times each spot has been used as recorded in the current history. To show these, tap the Counts button at the top-center of the screen, as shown in the next photo for pumps. The bottom number in each cell gives this count.
The counts are shown for a device type and time span. The time span is chosen by the button on the lower-right, which shows the number days. Tap on this button to cycle through the time spans of: 30 days, 90 days, and all days (when available.) You choose pump, syringe, or glucose monitor in the device menu at the bottom-center of the screen.
The color coding is explained by the legend in the upper-right corner. The Lower 10% color indicates potentially underused spots. The Upper 10% indicates potentially overused spots. For example, in the photo the red band across the stomach could indicate overuse of these spots. This would not be surprising as this is a convenient location and may indicate extra effort in avoiding these spots in the future.
The first photo shows the pump counts for the last 30 days. The next photo shows the monitor counts for the last 90 days. Over time these show the pattern of where you tend to choose spots.
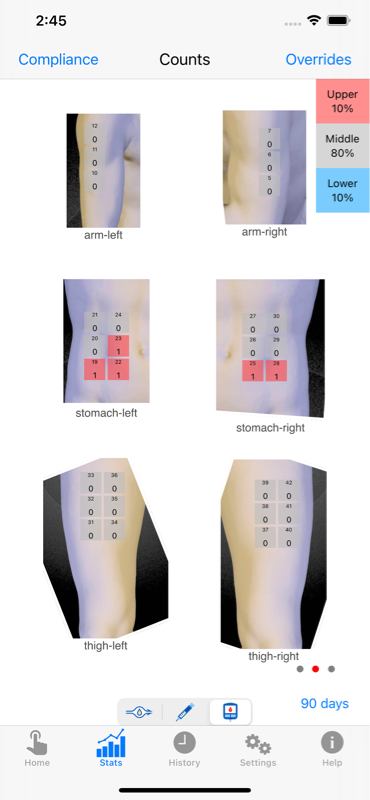
Override counts
The Override count of a spot is the number of times the spot has been used while unavailable. Overriding spots is described in the Overriding spots section above. To show these, select the Overrides button at the top-left corner of the screen, as shown in the photo. The bottom number in each cell gives this number. If the number is zero then it's not shown.
The counts are shown for a device type and time span. The time span is chosen by the button on the lower-right, which shows the number days. Tap on this button to cycle through the time spans of: 30 days, 90 days, and all days (when available.) You choose pump, syringe, or glucose monitor in the device menu at the bottom-center of the screen.
The color coding is explained by the legend in the upper-right corner. The 'Zero' color shows the spots that have no overrides. The 'One' color indicates spots with a single override. The 'Two or more' color indicates spots with more than a single override. An override may indicate the usual rest period for a spot was not followed for whatever reason. When a spot has several overrides it may indicate some sort of issue with the location.
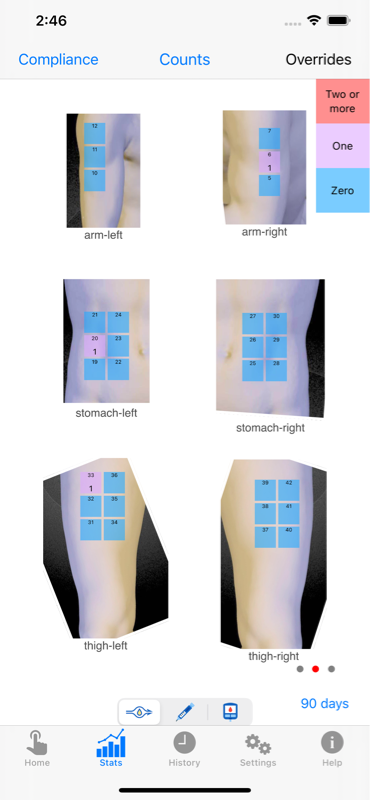
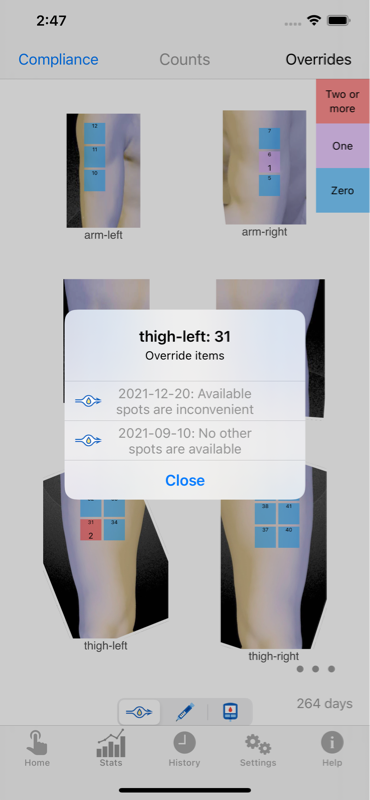
Tapping on a spot with overrides displays the list of the override reasons with their dates, as shown in the photo. If a spot has many overrides then it's likely a very popular spot. But this indicates proper site rotation is not taking place at this spot.
History screen
History screen video:
The History screen lists all the site selections and allows you to modify them in several ways. It is not expected and not recommended that the typical user should modify the history. It's well known from Star Trek that meddling with the timeline can cause bad and unexpected consequences. But if there is an error this screen may help you correct it.
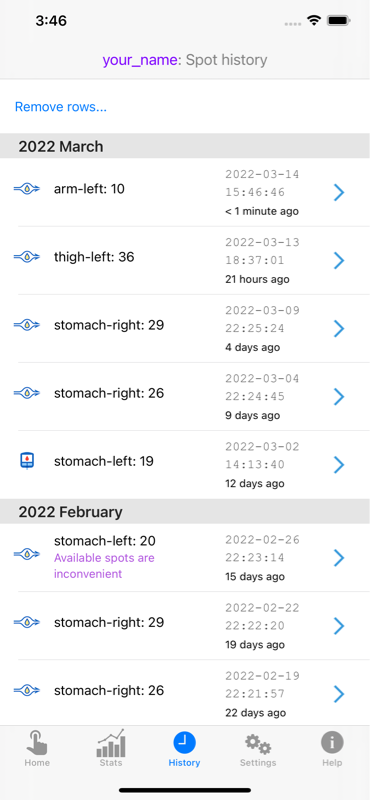
Deleting history items
You can delete a row by swiping the row to the left, as shown in the next screenshot. Tap the red Delete button on the right to confirm the deletion. Tapping anywhere else cancels the deletion.
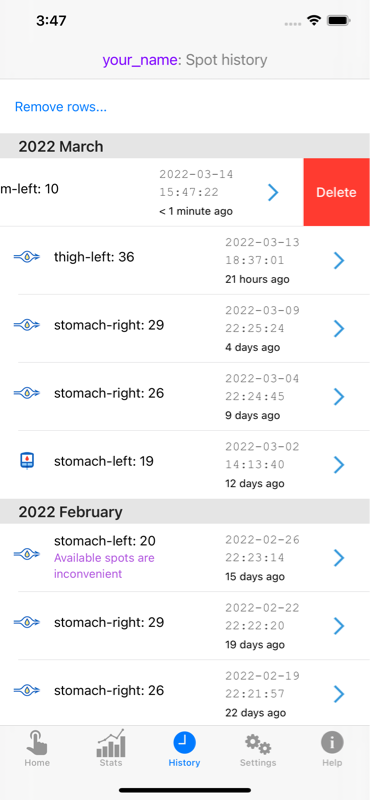
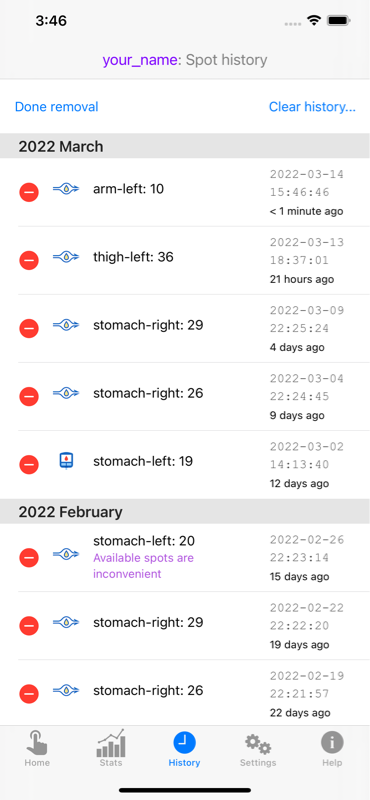
There's another way to delete history items and even clear the whole history. Tapping ‘Remove rows…’ at the top left readies the screen to delete rows, as shown in the photo below. To delete a row tap the red button on the left. It will show a red delete button on the right. Tap this to confirm the deletion. Tapping anywhere else will cancel the deletion.
On the top right there’s a ‘Clear history…’ button. Tap this to clear the whole history. An alert box will come up to confirm your choice. This will delete the whole history and is not recommended unless you know what you are doing.
Tapping the ‘Done’ button on the top left returns the screen to the original non-delete mode.
Altering history items
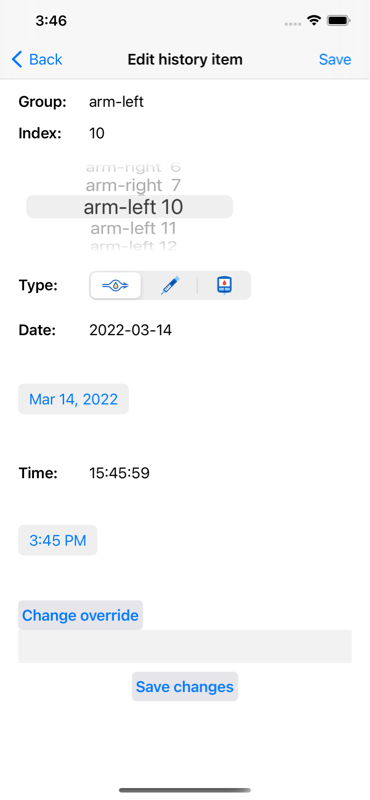
You can alter a history item by tapping on the row. This brings up the 'Edit history item' screen shown below. This screen allows you to modify anything in the history item: the spot location, the device type, the date and time, and the override reason. Tap Save to confirm your changes. Tap Cancel to exit without making any changes.
- If you choose a spot but then put the device somewhere else for whatever reason, then you can set the true spot here.
- If you replace your pump but forgot to record it in the app, then you can open the app later, choose the spot, go to the history item and adjust the entry to the correct time.
There are two ways to alter the override comment. Tapping on the Override text allows you to edit the comment in place. Tapping the "Change override" button brings up the Override alert box previously described in the Overriding spots section. This has the advantage that all the previous override comments are shown and you can choose one of them.
Settings screen
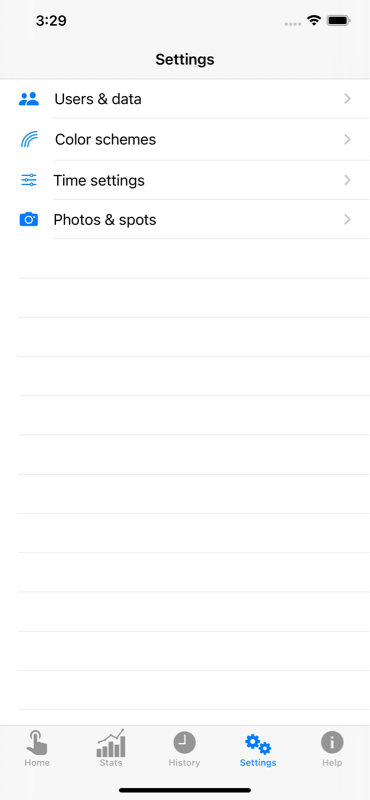
The settings tab shows the list of screens were all the adjustments to the app can be made. This is shown in the photo below.
Colors screen
The Colors screen (shown below) allows the user to select a color scheme. The colors in this scheme are then used to color code the spots in the other screens.
When a color scheme is selected from the list the legend below shows the color of each status with a brief description of the status.
All the schemes but the first are colorblind safe. This means most types of color blindness should be able to distinguish between the status types. The last three should work well for monochromatic vision. Try the various options and choose one that allows you to best distinguish between the colors.
You can change the color scheme at any time, but it is recommended to choose one and stick with it.
Time settings screen
The Time settings screen is where you manage following three types of settings for the app:
- Child-lock
- Cell width
- Recent and near parameters for each device type
These are shown in the screenshot:
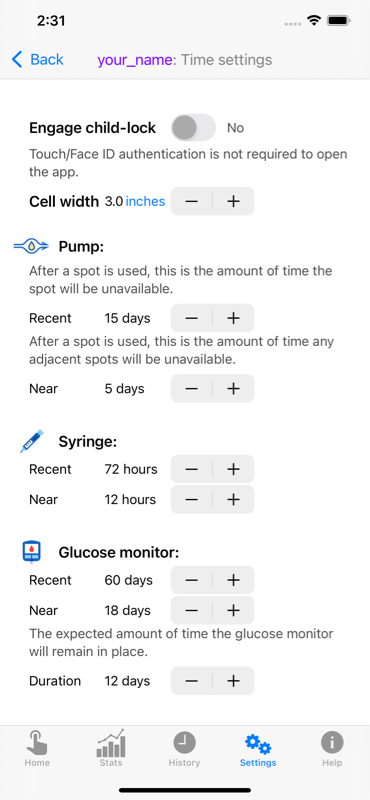
The Cell width parameter sets the distance between spots. The default is 3 inches. Tap the inches button to switch to centimeters. This parameter is used to determine the magnification of the photos in the overlays. This is done in the Set photo size screen.
Child lock
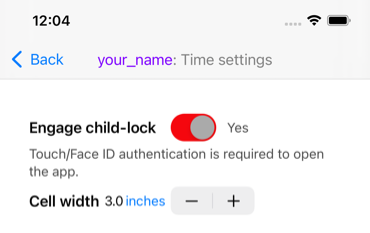
The app has a Child-lock feature. This only works for iPhones with Touch ID or Face ID. Also you must enable Touch ID or Face ID in the iPhones Settings. By default the child-lock is turned off, as seen at the top of the previous screenshot. You must tap the switch to turn this feature on, as shown in the next photo:
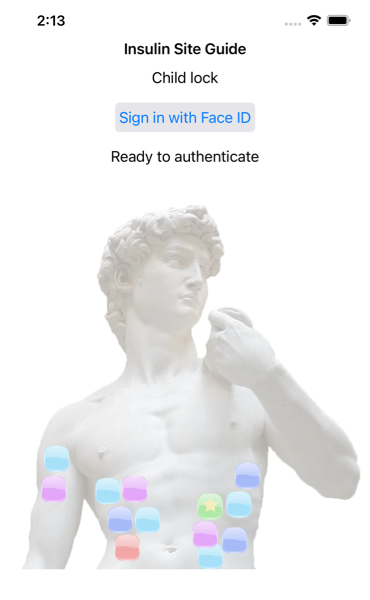
Now when the app opens a child-lock screen will appear, as in the next screenshot. Here you have to use Touch ID or Face ID to open the app.
If Touch ID or Face ID is not set up in the iPhones Settings then you will see the following warning when you turn on the child-lock:
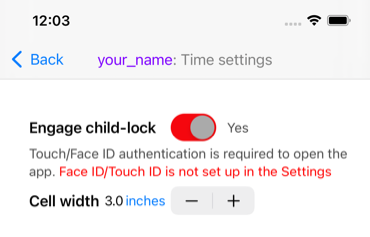
In this case, the pass-code will be used to undo the child-lock. The intent of the child-lock is to keep children out of this app on their parent's iPhone. Many children have the pass-code for their parent's iPhone in order to play games on the phone. So depending on the pass-code may not keep kids out of the app.
Recent and near parameters
Settings screen video:
The recent and near parameters control spot reuse.
- Recent parameter - the amount of time a spot is unavailable for reuse after it has been used. After this amount of time the spot will become available again.
- Near parameter - the amount of time a spot is unavailable after an adjacent spot has been used.
- Duration parameter - the recommended amount of time the continuous glucose monitor should stay in place. After this amount of time it should be moved to a new place.
Each device type has its own recent and near parameters. The screenshot shows the default parameter settings. When a syringe is used at a spot then the spot should not be reused for 72 hours, which is 3 days. When a pump is placed in a spot the spot should not be reused for 15 days. The syringe is used just once and entails less damage to the spot than a pump which stays in place for 2-3 days.
The pump and monitor parameters are measured in days. The syringe parameters are measured in hours, as they are typically shorter.
The pump and syringe devices do not have duration parameters.
When a spot is chosen it become unavailable and one is not allowed to choose the spot again for a time period. The Near parameter specifies the time period any adjacent spot is also unavailable. The two photos below illustrate this. The first photo (on the left or higher) shows six spots on the thigh as available (they are blue according to the default scheme.) In the next photo (below or to the right) spot 39 is chosen and shows green for New status. Spots 38 and 42 are adjacent to the chosen spot 39. So spots 38 and 42 have Near status, show light gray, and are unavailable (even though they haven’t been chosen directly.) According to the settings, chosen spot 39 can not be chosen again for another 15 days. And Near spots 38 and 42 won’t be available for 7 days.
When a spot is chosen it becomes unavailable for a time to enforce a resting period allowing the spot to recover from the insulin infusion. In addition, any adjacent spots also become unavailable for a time. This supplies a buffer zone around the selected spot to protect against the inaccuracy of pump and syringe placement.

Users screen
This screen lets you manage users of the app. Usually there will be only one user, namely the owner of the phone. But it is possible to have several users. For example, a health care worker could manage the app for several people all on one phone.
Each user has a name. The users can be managed in several ways.
These operations are discussed in the next few sections.
Each user has a profile, which contains all the information of the app for that single user. It contains:
- The user name
- Group and spot information
- Photos information
- The history of device placement positions
- Various settings
When you close the app or the app goes to sleep or the phone turns off the user profile is written locally (on the iPhone itself) saving any changes and history. When you open the app the user profile is read restoring everything back to how it was previously. The app does not require an internet connection to work.
The typical user doesn’t usually need to worry about any of this. It happens automatically. But there are a few situations where the user can intervene.
- Data retainment settings
- Automatic sync to iCloud (recommended)
- Export user profiles (sharing)
- Import user profiles
- Transfer a user profile between devices
We discuss these in the next few sections.
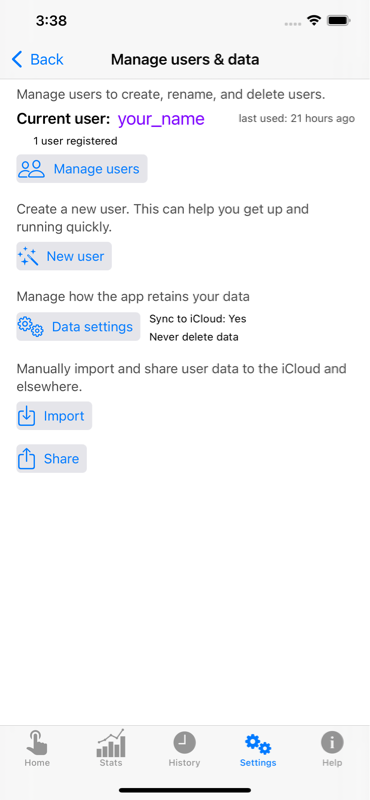
The Users screen is shown in the photo:
Create a new user
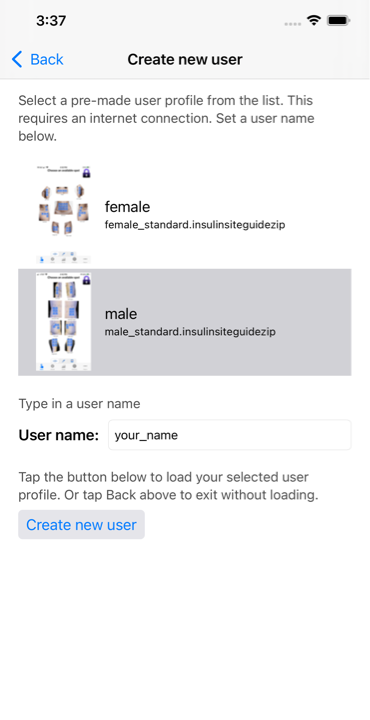
A new user is created by choosing a pre-made user profile from a list and choosing a name. These are free but you will need an internet connection.
The website contains a selection of pre-made user profiles files that can be imported directly into the app. Each profile contains several groups of spots with corresponding images. The groups cover stomach, arms, thighs, etc., for females, males, girls, and boys. Selecting one of these allows the user to get started with a profile that is ready to use. The history is empty and ready to begin. All the usual adjustments are possible but may not be necessary for most people.
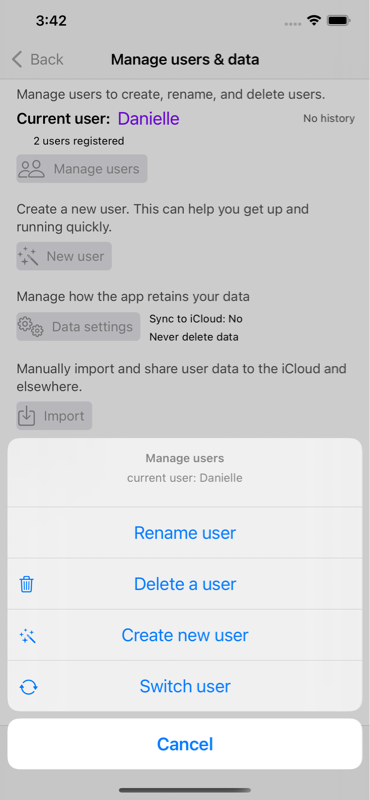
To create a new user go to the Users screen and tap the "Manage users" button. This open the "Manage users" menu showing several commands, as seen in the next screenshot. Tap the "Create new user" button near the bottom. This opens the screen for selecting a pre-made profile shown in the screenshot below. Scrolling through the table shows the available profiles. Select one. You will be prompted to type in a user name. Type in a unique user name. You should do this even if you are the only user on this phone. This will make it easier to transfer your data to a new phone in the future if necessary.
Now tap the "Create new user" button. This imports the profile. If the import is successful the app should automatically switch to the Home screen and you should see the new profile in place ready to use.
If the name you choose is already being used by an existing profile then a warning will appear letting you know. You can still use the name, in which case, a new user profile with this name will replace the existing profile. A copy of the older profile will be placed in the documents directory of the app where it can be recovered if necessary. See the Import user profiles section below on how to possibly recover old profiles.
Switch to a different user
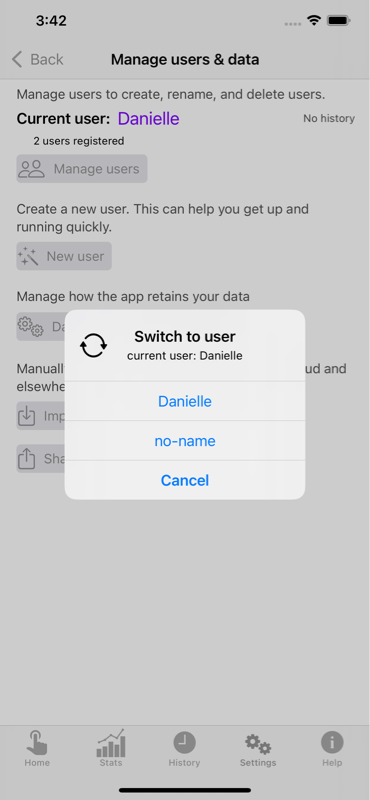
The app always shows one user at a time. To switch to a different user go to the Users screen and tap the "Manage users" button and choose the "Switch user" option from the menu. This will be enabled if the app contains more than one user profile. This opens a list of existing users, as shown in the next screenshot. Tap on a user to load the user's data. The previous user's data will automatically be saved.
Change the user name
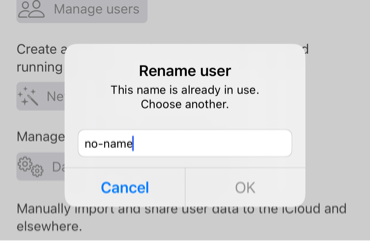
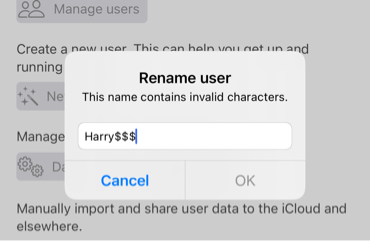
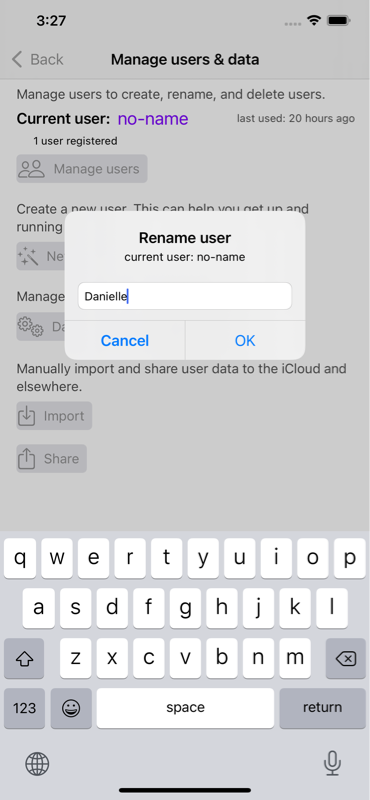
To change the name of the current user go to the Users screen and tap the "Manage users" button. This open the "Manage users" menu with several options. Tap the "Rename user" option. This opens a textbox to type in a new name. Only alpha-numeric characters, periods, dashes, and underscores are allowed including most printable unicode characters. But most symbol characters are not allowed.
Type in a name. The OK button will be disabled if any characters are not allowed or if the name is already in use. When the new name is acceptable then the OK button will be enabled. Tap it to use the new name.
Delete a user
To delete a user go to the Users screen and tap the "Manage users" button. This open the "Manage users" menu with several options. Tap the "Delete a user" option. This opens an alert box showing the names of the existing users, as shown in the next screenshot.
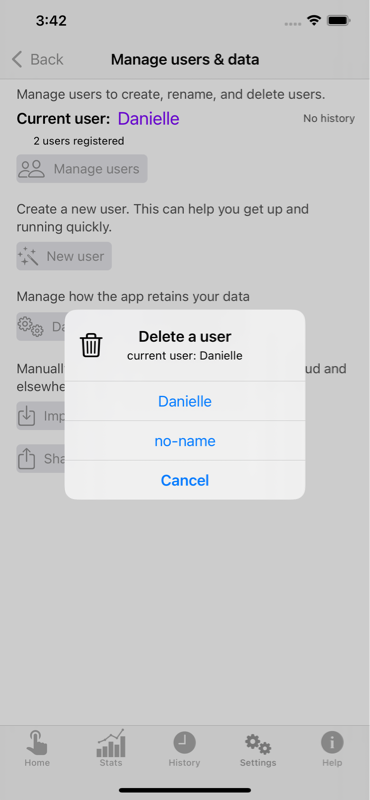
Tap a user to delete. A copy of the deleted user's data will be saved in the InsulinSiteGuide sub-directory in the sandbox (the "On my iPhone" directory.)
The app requires at least one user at all times. So if there is only one user then the app will refuse to delete it. If there are two or more users then the app will delete the chosen user to delete. If the chosen user is the current user then the app will delete the user and switch to another user.
Data retainment settings
The Data settings screen lets you control how your data is retained. The Data settings screen has two settings:
- Automatic sync to iCloud (recommended)
- Data retainment settings
Starting at the Users screen the animation shows how to access the Data settings screen.
When the Sync to iCloud button is turned on, the app copies your user data to the iCloud. This is optional and described in more detail in the next section.
Backup files of your data are sometimes store on this iPhone (for example, when you delete user profiles.) You can opt to delete these old files automatically after 1 month, 12 months, or never. This will make little difference when there is only one user.
Sync to the iCloud
If you choose to, the app saves your user profile data to the iCloud. This is for two reasons: safety and convenience. If you lose your phone or it breaks or you change phones then the profile will be available on the iCloud and not be lost. In either situation the user profile can be recovered on your new phone and the app will get up and running as usual. Warning: for this to work, you need to be signed into the iCloud and you need to give the app permission to access the iCloud. If you are not signed into the iCloud or you do not give the app permission to use the iCloud then the app will work as usual. It just won't save your user profile data to the iCloud.
When the app tries to access the iCloud for the first time you will be prompted to give the app permission to access the iCloud. You can choose to give permission or not. After this the app will remember your answer and not ask again. You can change your mind at anytime. Just go to the Users screen and adjust the 'Sync to iCloud' setting on the Data settings page as you like.
When the app is closed or goes to sleep the app save the user profile data to it's private location on the phone itself. If you have 'Sync to iCloud' turned on then the app saves the user profile data to the iCloud also. On the iCloud drive the data file looks like:
iCloud Drive: InsulinSiteGuide/your_name.insulinsiteguidezip
but with your actual user name.
Export user profiles (sharing)
On the Users screen tap the Share button at the bottom. This opens the share sheet of options for sending your user profile data as an attachment. As visible from the photo you can send your data by email, messages, and other services depending what apps are installed on you phone.
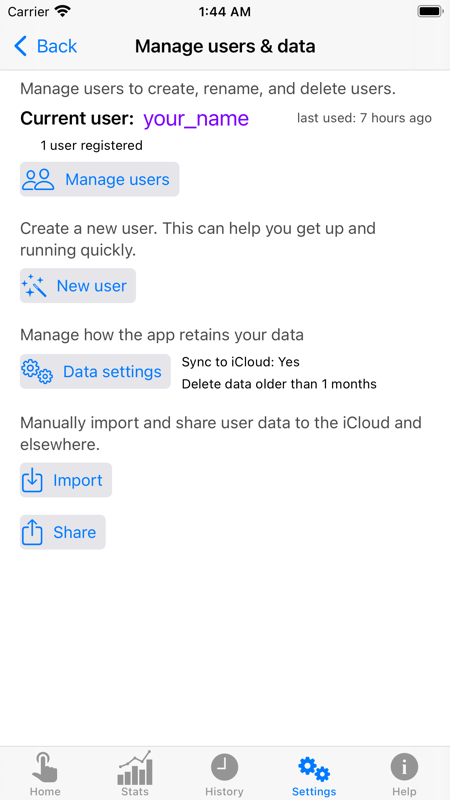
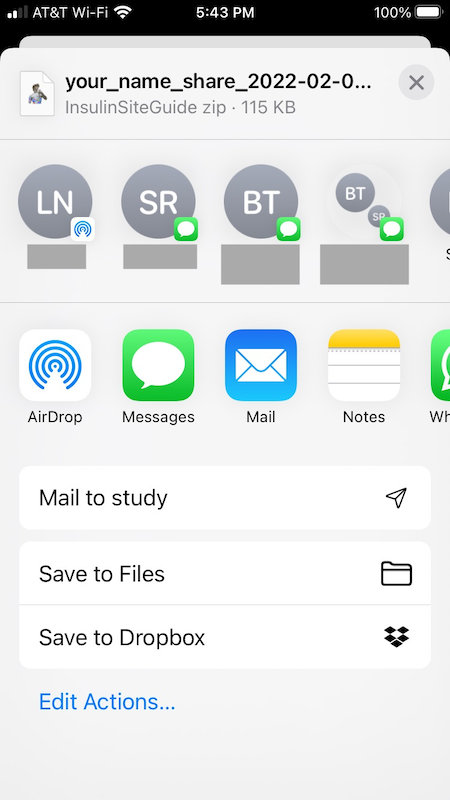
There are many possible uses for this. You can send you data to your doctor, diabetes advisor, or other healthcare provider.
If you customize your profile images, etc., then you can share your profile for others to use, via Facebook, say. If you do this then 'Clear history' first (see the Deleting history items section.)
Export by mail
To send a user profile by email, tap the Mail button on the share sheet. This opens a new email with your user profile as an attachment. Fill in the recipient email address in the To field. Press the up arrow in the upper-right corner to send the email.
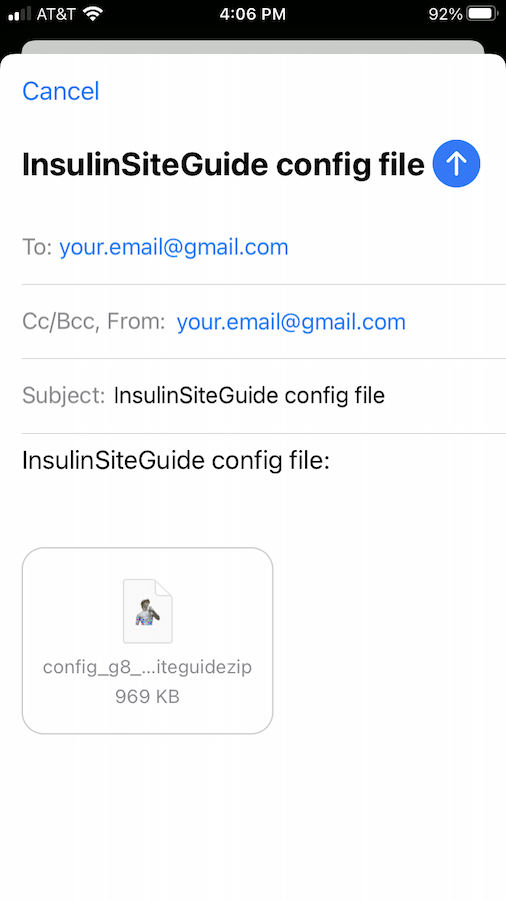
If you get a new phone you can also send your user profile to yourself. This way you can continue to work with the app on the new phone where you left off.
To do this, tap the Mail button on the share sheet, which opens a new email with your user profile as an attachment. To send to yourself, put your own email address in the To field and press the up arrow in the upper-right corner to send the email. Now go to the other phone and import the attachment.
Export to the file system
You can save a user profile to the file system on your phone or to the iCloud. To do this go to the Users screen, tap the Share button, and locate the 'Save to Files' option in the share sheet, as seen in the image above. Tap the 'Save to Files' option in the share sheet. This opens the file system browser as shown in the next photo. You should see the iCloud or 'On My iPhone' or possibly other options.
You can navigate to where you want to save the user profile. To save to the iCloud, for example, tap the iCloud folder. You should see the InsulinSiteGuide folder. Tap on this directory, which is made specifically for this app and should be visible to your other iOS devices connected to the iCloud. Tap the Save button in the upper-right corner to save your user profile.
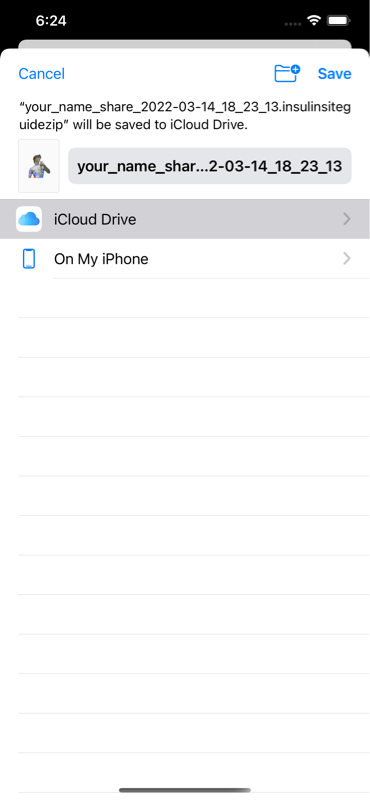
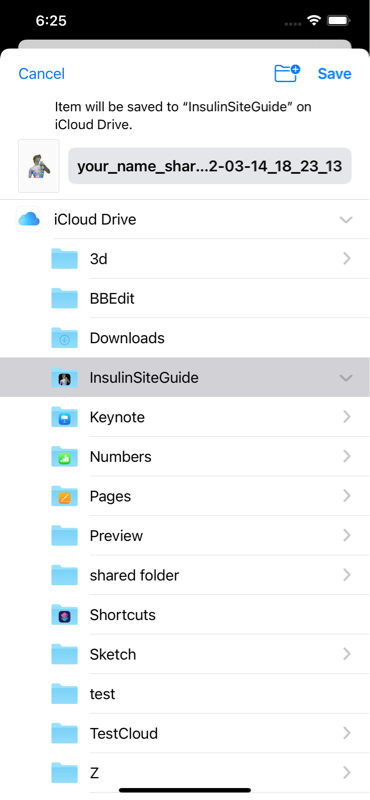
It is necessary that the app have permission to access the iCloud or external directory. On the first attempt to access the iCloud the device may request permission to do so. To continue you must give permission.
Import user profiles
User profiles can be imported into the app in several ways.
Importing from mail
If an email has a user profile as an attachment then you can tap or long-press the attachment. This opens a menu as in the next photo. Tap the Share option. This should open a share sheet as in the second photo. This should show the Insulin Site Guide app as an option. Tap on this to import the user profile into the app.
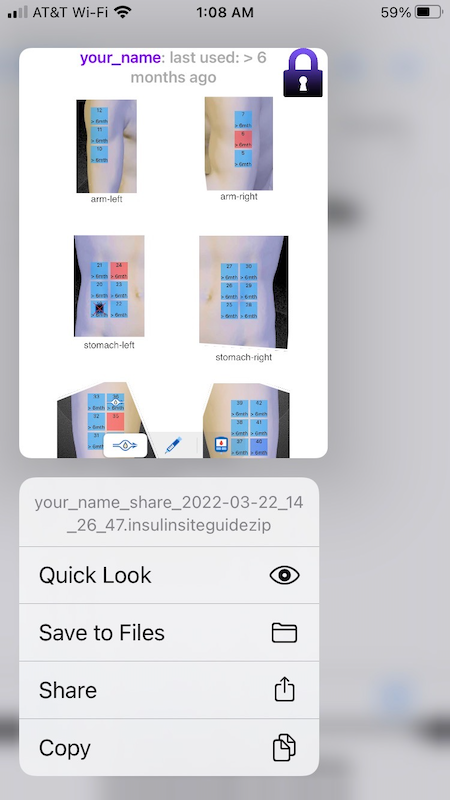
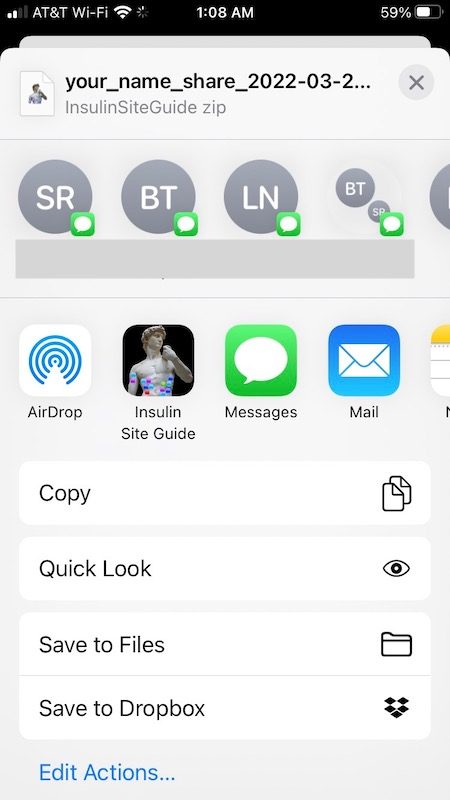
Importing a user profile in a text message is similar.
This doesn't work if the Child lock feature is turned on. Turn off the Child-lock temporarily in order to import.
Importing from the file system
You can import user profiles from the file system. If you use the Sync to the iCloud option then a copy of your user profile is periodically saved to the iCloud Drive. You can recover this profile as follows.
On the Users screen tap the Import button just above the Share button. Navigate to the iCloud Drive directory and then into the InsulinSiteGuide sub-directory. Tap on the user profile you want. If there are several with the same user name then the most recent profile is probably the one you want. Tapping should open the profile and bring you to the Home page.
The 'On My iPhone' directory contains an InsulinSiteGuide sub-directory also. This contains backups of user profiles when they are deleted and in several other situations. Go to this sub-directory to recover these files.
You can also access these directories and more with the Files app. Just open the files app and navigate to any directory storing user profiles. User profiles are recognized from the app icon:
Tapping a profile loads it into the app.
Transfer a user profile between devices
We assume you've been using the app on a device (an iPhone or iPad) with a user profile in place and have built up a history that you want to transfer to a second device. This is a two step procedure:
- Export the user profile from the first device with any of the methods described in the Sharing section above.
- Import the user profile to the new device with the corresponding method from the Import user profiles section above.
Photos screen
The Photos screen allows the user to manually adjust the spot configuration. This screen, shown below, displays the groups of spots ready to be adjusted. This is an intermediate topic and not recommended for beginners.
For beginners, there are pre-made configuration files available to help you get started quickly. Go to the Users screen for this.
There are two editing modes:
- Groups
- This shows all the groups
- The top title says “Groups”
- The upper-right button shows “Create group”
- Edit group: this allows the editing of a single group
- Shows just the single group being edited
- The top title says “Edit group”
- In the upper-right is the “Save” button.
- The lower-left menu shows "Group action”.
All group mode
When first entering the Photos screen the app is in Groups mode. This is shown in the photo:
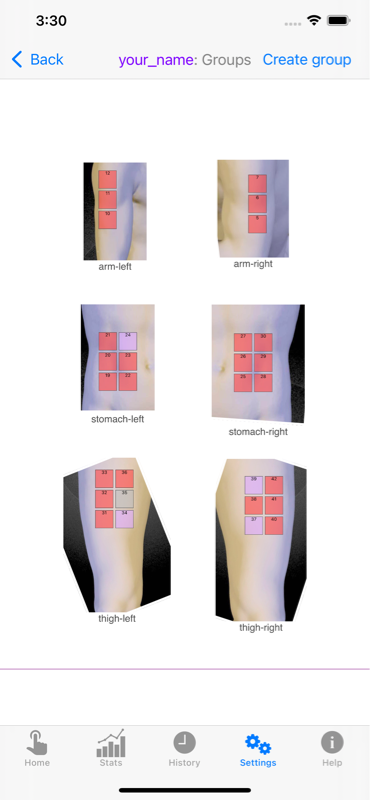
When in Groups mode you can perform the operations:
- Move the groups into convenient position by dragging the the groups.
- Tap on a group to go into Edit group mode.
- Create a new group of spots. Tapping on the "Create group" button in the upper-right opens the Create a new group of spots screen.
Create a new group of spots
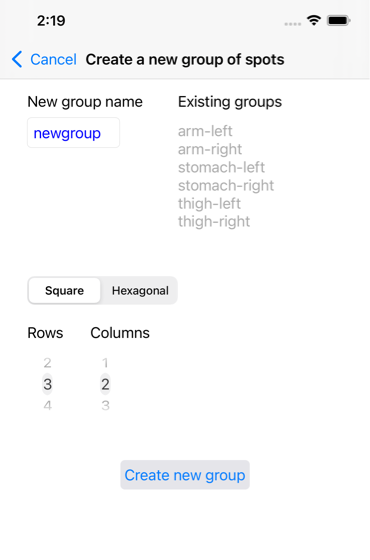
In the Photos screen there’s a “Create group” button in the upper-right corner. Tapping on this button opens the ‘Create a new group of spots’ screen shown below.
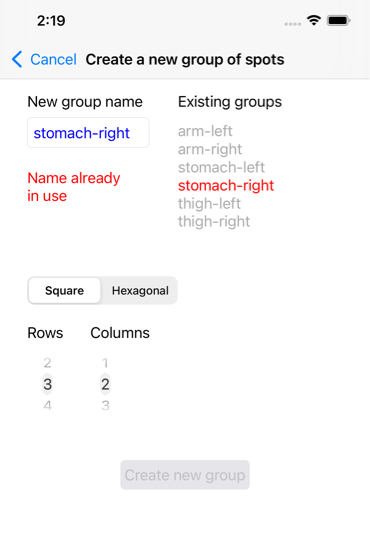
In this screen you type a new name into the blue edit field at the top-left corner under the ‘New group name’ label. This will contain a default name ‘newgroup’. But this should be changed to something more informative. The new name must be different from the other existing group names, which are shown in the list to the right (if there are any.) If it is not different then it will turn red and highlight the group name in the list that is already taken, as seen in the second screenshot below. Change the new name until it is unique.
Set the number of rows and columns to the desired numbers.
When ready, tap the ‘Create new group’ button below. At any time you may tap the ‘Cancel’ button to go back to the previous screen and not create a new group. The group will be created and displayed with the other groups. You may have to move some of the groups around to uncover the new group.
Edit group mode
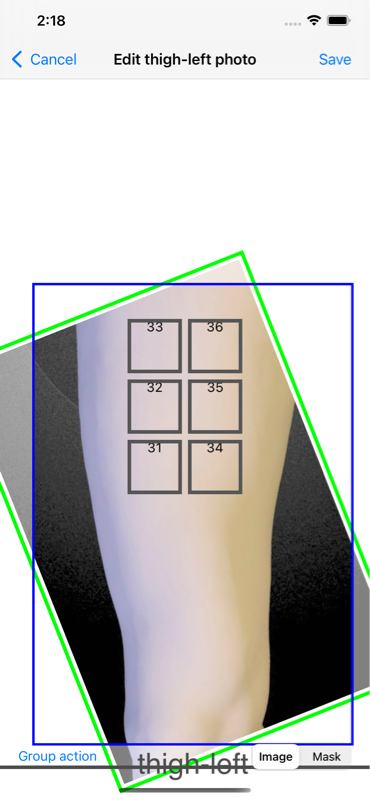
When in the Photos screen just tap on a group to enter the Edit group mode for editing that group. For example, tapping on the ‘Thigh-left’ group in the lower-left corner puts the app in ‘Edit group’ mode as shown in the screenshot. Also visible is the "Group action” menu in the lower-left corner.
There are two ways to edit:
- Adjust the photo position directly
- Select an operation from the Group action menu.
Adjust the photo position
When a group has a photo then two buttons appear on the lower-right side of the screen: the Image and Mask buttons (you must be in Edit mode to see these. If needed, tap the group to go in this mode.)
When the Image button is selected the photo can be dragged and rotated with two finger gestures. Dragging also works with one finger. Arrange the photo so the spots are in the right location and orientation.
The spots are typically from 2 to 3 inches square. The exact value is set by the "Cell size" in the Time settings screen. The photo needs to be zoomed or scaled to the correct size consistent with the cell size. This is done with the Set photo size command in the Group action menu. It is possible to zoom the photo by pinching with two fingers but this needs to be enabled by the switch in the Set photo size screen.
The Mask button allows adjustment of the mask. This is a window that allows part of the photo to show through. With the mask you can select part of the photo to be visible and the remainder to be hidden. In the Photo screen the whole photo is visible and the mask has a blue outline to indicate the mask. In the Home screen any part of the photo outside the mask will not be visible. This way you can exclude distracting elements.
When the Mask button is selected you can drag and zoom the mask (but not rotate) to select the part of the photo you want to display. It is recommended to set the mask large enough to include some of the area surrounding the spots so as to make it easy to understand at a glance where the spots are located.
Making all these adjustments are hard to explain but not hard to do. The easiest way to learn is to watch the accompanying video.
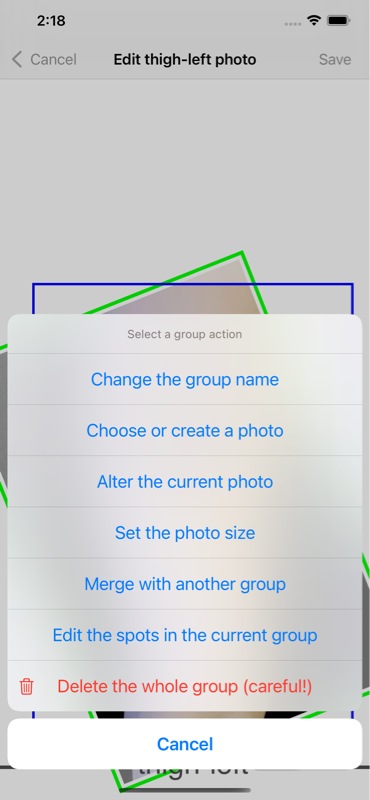
Group action menu
The Group action menu is in the lower-left corner of the Edit group mode screen. You can tap on the menu button itself or tap on the group image to bring up the Group action menu. The Group action menu contains the following operations:
- Change the group name
- Choose or create a photo
- Alter the current photo
- Set photo size
- Edit the spots in the current group
- Delete the whole group (spots and photo)
- Merge with another group
These actions are explained in the next few sections.
Change the group name
When editing a group, tap the ‘Group action’ button (in the lower-left corner) or just tap the group to open the ‘Group action’ menu, shown above
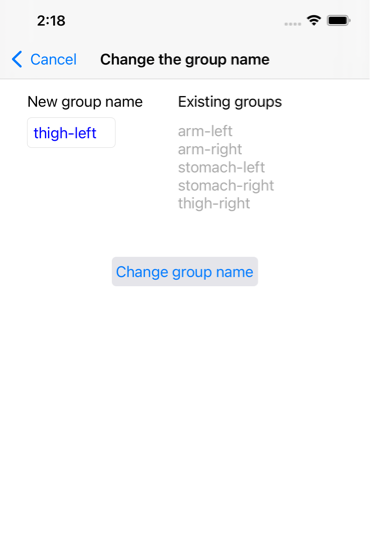
Tapping the ‘Change the group name’ option brings up the ‘Change the group name’ screen shown below.
There’s a blue edit field at the top-left corner under the ‘New group name’ label. This will contain the current group name. In the photo example it has the ‘thigh-left’ group name in blue.
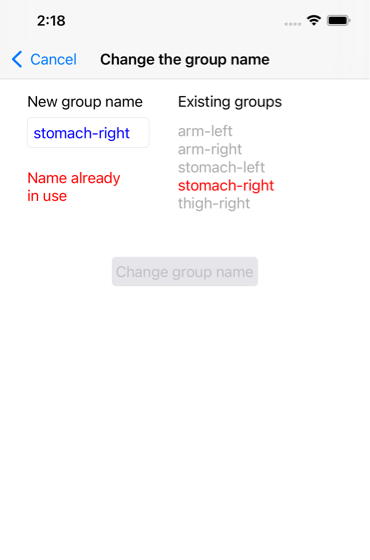
Type in a new group name in the blue edit field. This name must be different from the other existing group names, which are shown in the list to the right (if there are any.) If it is not different then it will turn red and highlight the group name in the list that is already taken. Change the new name until it is unique.
When ready, tap the ‘Change group name’ button in the lower-right corner. At any time you may tap the ‘Cancel’ button to go back to the previous screen and not alter the group name.
Create a photo overlay
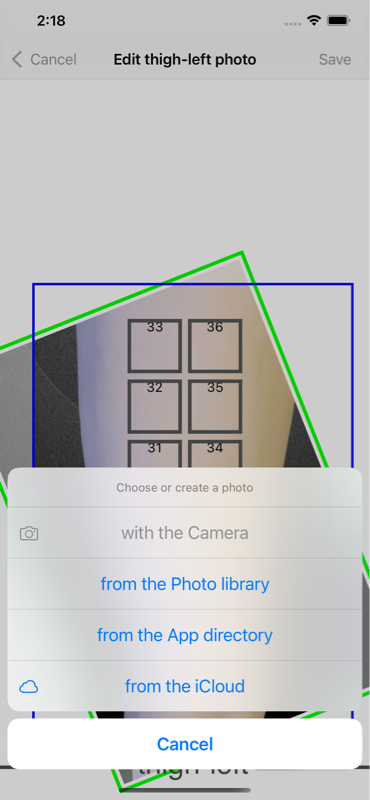
A photo overlay for a group is created by selecting a photo. In the 'Group action' menu, describe above, tap the 'Choose or create a photo' item. This opens the menu shown in the screenshot below. A photo can be chosen from several sources such as the App directory or the iCloud. Also the camera can be used to create a photo outright. This process is described in the next section.
Choose or create a photo
To choose a photo for a group tap on the group to enter ‘Edit group’ mode. Tap on the group again to bring up the Group action menu. Now tap the 'Choose or create a photo' item, which shows the options to choose a photo, namely, from the App directory, Photo library, or iCloud or create a photo with the camera. If the group already has a photo then choosing a new photo will replace the old one.
If you choose ‘Camera’ then the camera should open. Take a picture and if it is acceptable tap ‘Use photo’. This should place the new photo behind the group of spots. The next section goes over how to adjust the photo.
The first time you access the camera from this app the iPhone will ask if you give permission for the app to use the camera. Give permission to continue.
When using the camera keep the camera about 12 to 15 inches from the area of the body. Also keep the camera perpendicular to the surface and not at an angle. Otherwise the photo will be distorted and not easy to adjust to the proper size.
Choosing ‘Photo library’ opens the Photos app. The camera stores photos here. You can also store photos here from emails or texts. Select a photo or, at any time, tap the Cancel button to exit.
Choosing ‘iCloud’ opens the file browser showing the iCloud Drive. You may also see Dropbox or Google Drive if you have either of them installed. Select any photo that’s available or tap the Cancel button at any time.
Choosing ‘App directory’ opens the App’s own directory, also called the Sandbox. This is where all the photos used by the app are stored. When loading a photo from a remote location such as the iCloud it is copied to the App directory and used by the app from there. If you change to a new photo but prefer a previous photo you can probably find the earlier one in the App directory.
If you don’t like a photo you can simply choose another or delete it.
Having chosen a photo it will likely need some adjustment and be moved into position. This is described in the next sections.
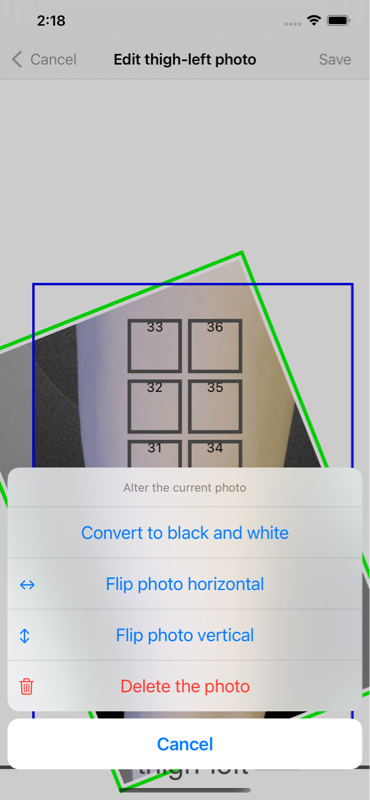
Alter the current photo
The option ‘Convert to black and white’ is often useful as the spots are color coded and you don’t want them confused with colors in the photo. Converting the photo to black and white eliminates this confusion.
The option ‘Flip photo horizontal’ is often useful. For example, a photo of a right arm can be used as a left arm after flipping the photo horizontally.
When the camera is used upside-down then the ‘Flip photo vertical’ operation makes the photo right-side-up.
A photo usually needs to be shifted, scaled, and rotated to give a reasonably accurate view of the context around the spots. Also a mask is positioned to show just the part of the photo desired and eliminate distracting elements. This process is described in the section Adjust the photo position.
You can delete a photo at any time with the ‘Delete photo’ option. There’s no requirement to even use a photo but it is highly recommended because it lets you see the position of spots at a glance. You can replace a photo merely by selecting a new one as just described. You don’t need to delete an existing photo before replacing it with a new one.
Set the photo size
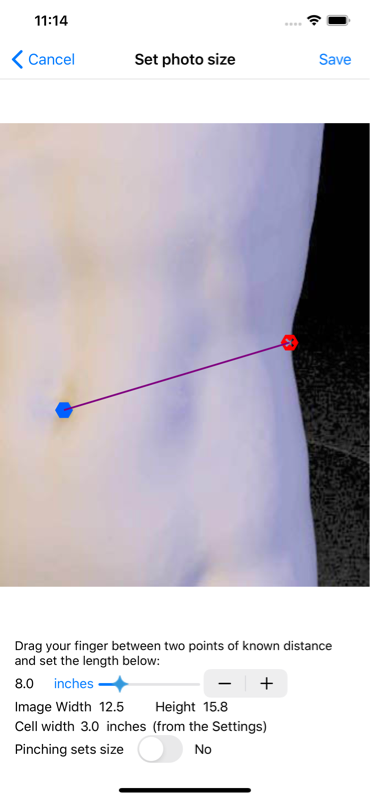
Each photo must be zoomed or scaled to the correct size consistent with the spot size. The 'Set photo size' screen, shown below, allows you to set the image size.
The current image width and height are shown (but these will be wrong unless you have set the size as explained in this section.) The cell width is the distance between spots and is also shown. This can be adjusted in the Time settings screen.
To set the size of this photo follow the steps:
- Drag your finger between two points on the image
- Set the distance between these points in the slider below
Before you do this, you need to measure the distance between two points using a ruler or otherwise. Choose two points that are far from each other (but still within the photo.) If the points are too close then the accuracy will suffer. Also, the ruler should be parallel to the plane of the image, not at an angle. Or, if using a camera, the ruler should be perpendicular to the line-of-site of the camera. The two points can be at any orientation: horizontal, vertical, or any angle. It doesn't matter. The size of the photo will be calculated correctly.
It is possible to zoom the photo in the "Photo edit" screen by pinching with two fingers. To do this, enable the 'Pinching sets size' switch at the bottom of the screen. Then go back to the "Photo edit" screen (by tapping the Save or Cancel button.) Pinching will then zoom the photo (pinching never works in the "Set photo size" screen.) By default, pinching is turned off. This way only dragging and rotation occurs in the "Photo edit" screen. When pinching is enabled dragging, rotation, and zooming (pinching) occurs simultaneously in the "Photo edit" screen. This can be hard to control but you may prefer it.
Edit spots screen
The Edit spots screen allows the following operations:
These actions are explained in the next few sections.
Warning: moving or deleting spots after the initial setup is not recommended. A spot indicates where you have placed a pump in the past. When you move a spot then you lose this information of what happened in the past. But if a spot is in the wrong place and you want to fix it then you can move it. Any such movements should only be small adjustments so as to not lose past information. Similarly, spots should not be deleted because you lose the information about the past. If you never use a certain spot then you can delete it if you insist. But still it is recommended to keep the spot and mark it as avoid.
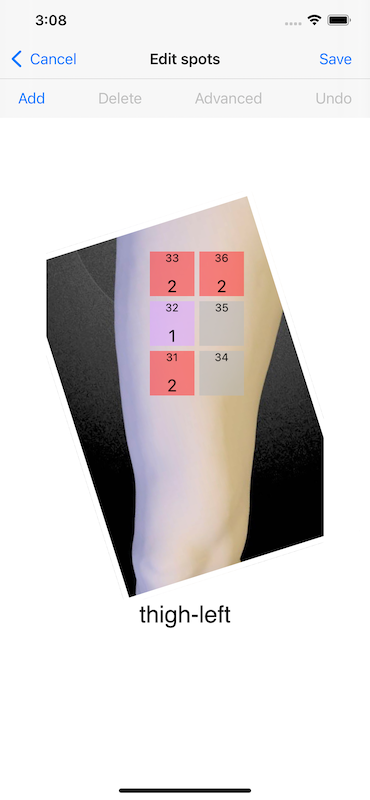
The Edit spots screen shows the spots that have been used as a reminder to be careful in moving them. In the following screenshot, the lower number in each spot is the number of times the spot has been used (or zero if there is no number.) For example, the upper-left spot 33 has been used 2 times and the lower-right spot 34 has never been used.
Selecting and moving spots
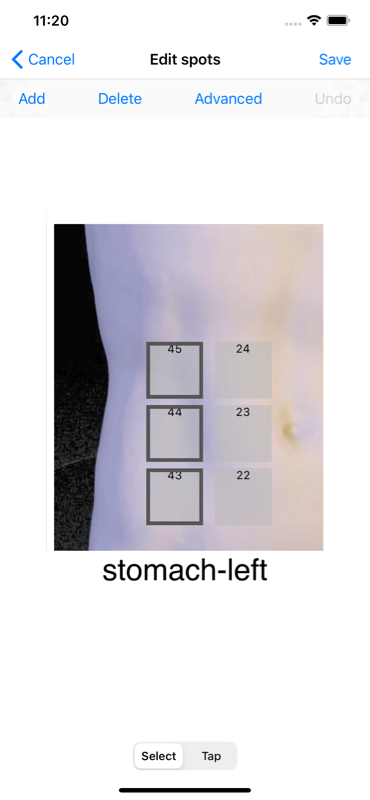
Select some spots by tapping on them. Selection is confirmed by the border turning dark. This is seen in the next screenshot. Tapping on an already selected spot unselects the spot. Tapping off any spot deselects all the spots. Tapping again off any spot selects all the spots.
Dragging moves the selected spots. The unselected spots don't move. This is shown in the second screenshot where the two selected spots were dragged downward but the unselected spots didn't move. Tap the Save button to keep any changes.
Add new spots to an existing group
More spots can be added to a group that already has some spots. In the Edit spots screen just tap where you want to create new spots. Then tap on spots to select or deselect them and then move, delete, undo spots, etc.
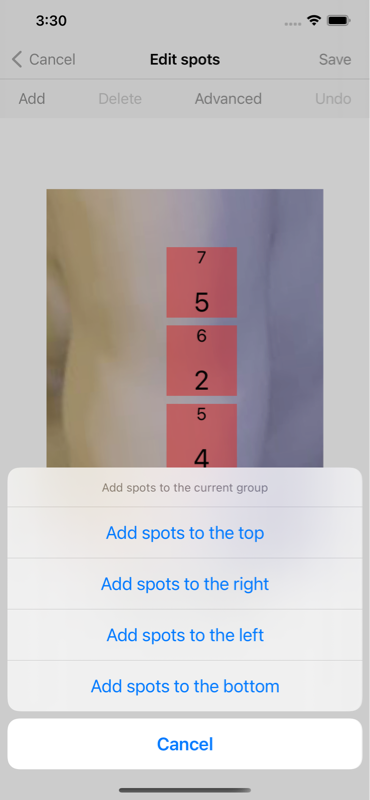
Spots can also be added with the Add button in the upper-left corner. Tapping the Add button opens the Add menu shown in the next screenshot and shows the options.
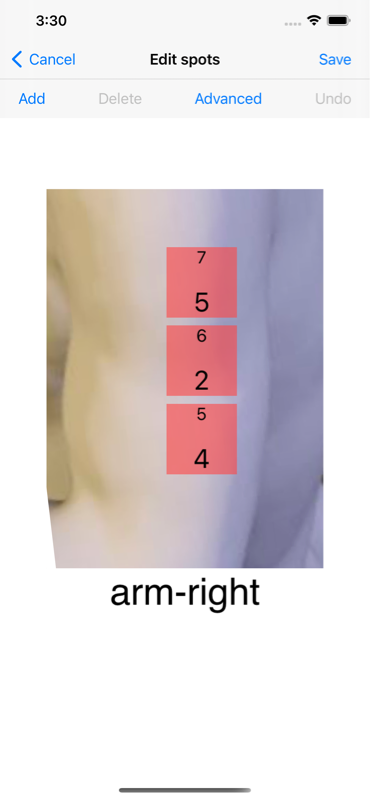
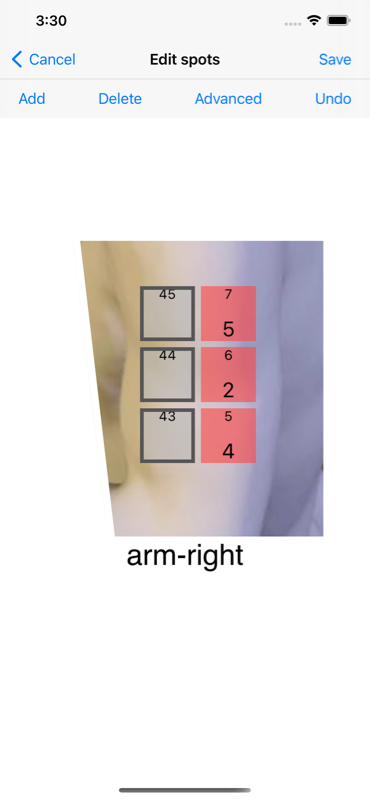
For example, the next screenshot shows the right arm in Edit spots mode. Tap the Add button at the upper-left of the toolbar. This displays the menu for adding new spots. Tapping "Add spots to the left" adds a column of spots on the left, as shown in the second screenshot. The third screenshot shows a new column of spots to the left of the original spots. Tapping the Undo button on the upper-right undoes the operation. You can select any of these spots to move them (as described in the previous section) or delete them (as described in the next section.)
Delete spots from a group
Spots can be deleted from a group. For example, in the Edit spots screen select some spots. Tapping the Delete button deletes the selected spots as shown in the animation. Tapping the Undo button on the upper-right undoes the operation. Tap the Save button to keep your changes.Split-up a group of spots (advanced)
This is an advanced topic not suitable for beginners.
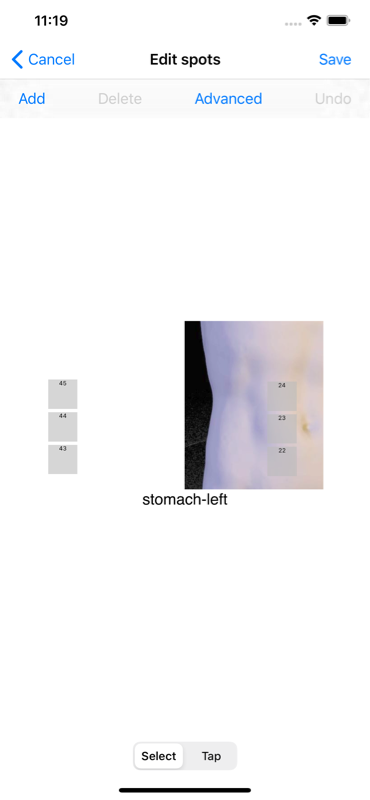
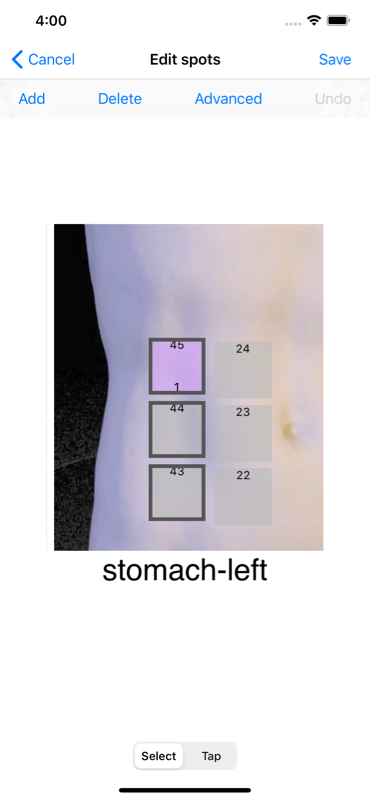
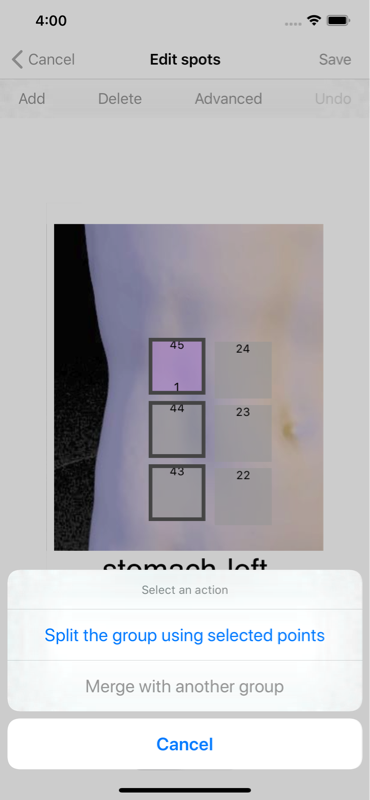
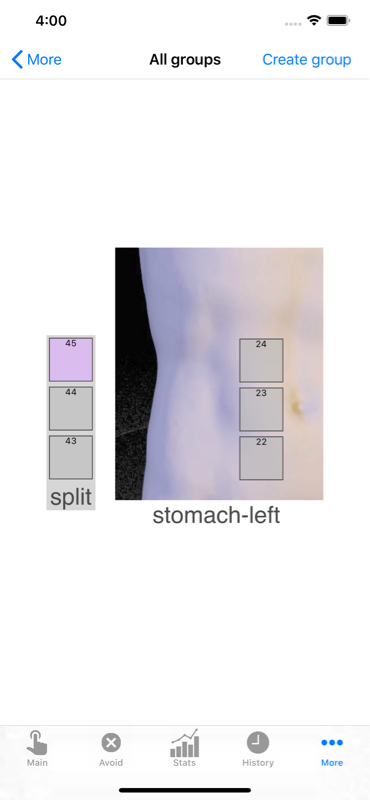
A group of spots can be split-up making two groups of spots. The following screenshot shows the "stomach-left" group of spots in Edit spots mode. The three spots on the left side are selected. Tapping the Advanced button brings up the Advanced menu as shown in the second screenshot. Selecting the "Split the group using selected points" option splits off the selected points into a new group of its own called "split". This is shown in the third screenshot. The original group "stomach-left" remains but without the selected spots. The new group "Split" shows the three spots split-off from the their previous group. This new group has not had a photo chosen yet. The spots have the same spot indicies (the numbers at the top of each spot.) These spots retain their connection to any history items they may have had. In this example, spot 45 in the Split group is pink, which shows it retained the connection to its history items.
Delete the whole group
You can delete a group of spots and its photo (if there is one) with the ‘Deleted whole group’ option. For example, if during setup you create a group with the wrong number of spots then it makes sense to the delete the whole group and start over.
If your configuration has a group that you are sure you will never use then you can delete it. But if you have been selecting spots with a configuration for a while then it is not recommended to delete any groups. Without getting into too much detail, the history items are connected to the spots in the groups. If you delete a group and its spots then the connected history items will lose this connection and you will not be able to easily recover the connection by making another group of spots.
Merge with another group (advanced)
This is an advanced topic not suitable for beginners.
It is possible to merge two groups of spots into a single group (and also to split a single group into two groups, as described in a section below.)
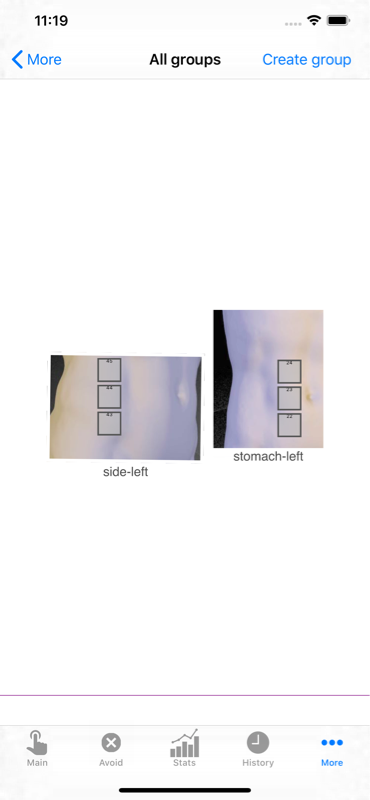
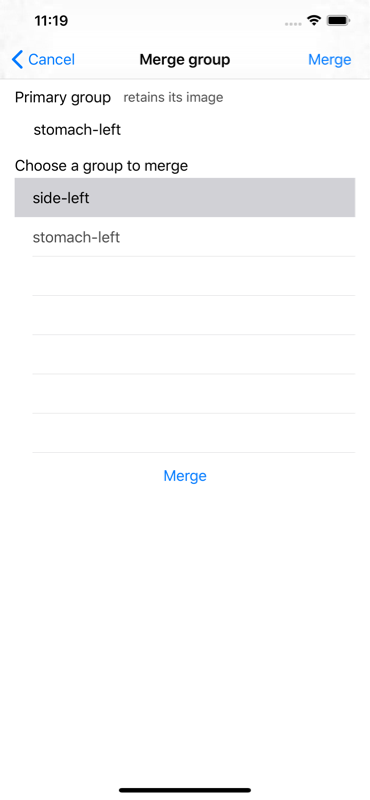
For example, the next screenshot shows two adjacent groups of spots in the Photos screen that could be combined into one group. To combine these, we select the "stomach-left" group. This becomes the primary group, which will retain its image. Now tap "Merge with another group" in the action menu. This brings up the "Merge group" screen shown in the next screenshot. Select the "side-left" group and tap the Merge button below.
This adds the spots from the "side-left" group to the "stomach-left" group as shown in the next screenshot. Now we can move those spots into position.
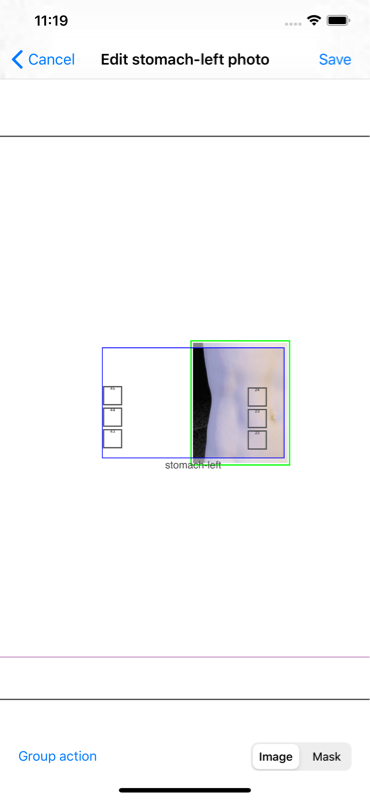
To do this, choose the "Edit spots" group action. This brings up the Edit spots screen in the next screenshot. Select the spots and move them into position as desired. Don't forget to tap the Save buttons the keep your work.
